Category: Mayura International
How to upload Notebook to Anaconda Cloud (CLI Option)
Step #1
Check if the Anaconda User is signed into the Anaconda Cloud from the Anaconda Navigator
C:\> anaconda whoami
This should display:
Username: gudiseva
Step #2
If Anaconda User is not signed in, then …
C:\> anaconda login
… provide Anaconda Username and Password
Step #3
Navigate to the folder where the notebook file is saved and upload the notebook to Anaconda Cloud
C: \> anaconda upload notebook.ipynb
Run Scala script in Production
Steps
[hadoop@ip-xx-y-zz-12 ~]$ vim /mnt1/analytics/arvind/deploy/scala-redis.sh
#!/bin/sh
export HTTP_HOST=xx.y.zz.12
echo $HTTP_HOST
exec java -classpath "/mnt1/analytics/arvind/deploy/scala-redis.jar" "com.csscorp.restapi.RestServer" "$0" "$@"
!#
[hadoop@ip-xx-y-zz-12 deploy]$ chmod -R 777 scala-redis.sh
[hadoop@ip-xx-y-zz-12 deploy]$ nohup sh scala-redis.sh > ./scalaredis.log 2>&1 &
[hadoop@ip-xx-y-zz-12 deploy]$ jps
22938 RestServer
22961 Jps
Reference
Scala java.lang.NoSuchMethodError: scala.Predef$.augmentString error
Using Typesafe in Scala
Using Typesafe library of Scala, we can override the configuration settings. This post describes the techniques:
build.sbt
libraryDependencies ++= Seq.apply(
  // --- Dependencies ---,
  "com.typesafe" % "config" % "1.2.1",
  // --- Dependencies ---
).map(
  _.excludeAll(ExclusionRule(organization = "org.mortbay.jetty"))
)
application.conf
redis {
  host = "localhost"
  host = ${?REDIS_HOST}
  port = 6379
  port = ${?REDIS_PORT}
}
Config
package com.csscorp.util

import com.typesafe.config.ConfigFactory

/**
  * Created by Nag Arvind Gudiseva on 15-Dec-16.
  */
object Config {

  /** Loads all key / value pairs from the application configuration file. */
  private val conf =  ConfigFactory.load()

  // Redis Configurations
  object RedisConfig {
    private lazy val redisConfig = conf.getConfig("redis")

    lazy val host = redisConfig.getString("host")
    lazy val port = redisConfig.getInt("port")
  }

}
TypeSafeTest
package tutorials.typesafe

import com.csscorp.util.Config.RedisConfig

/**
  * Created by Nag Arvind Gudiseva on 26-Dec-16.
  */
object TypeSafeTest {

  def main(args: Array[String]): Unit = {

    val redisHost = RedisConfig.host
    println(s"Hostname: $redisHost")
    val redisPort = RedisConfig.port
    println(f"Port: $redisPort")

  }
}
Terminal
C:\ScalaRedis> sbt clean compile package
C:\ScalaRedis> scala -classpath target/scala-2.10/scalaredis_2.10-1.0.jar tutorials.typesafe.TypeSafeTest
Output:
    Hostname: localhost
    Port: 6379

C:\ScalaRedis> SET REDIS_HOST=1.2.3.4
C:\ScalaRedis> echo %REDIS_HOST%
Output:
    1.2.3.4
C:\ScalaRedis> SET REDIS_PORT=1234
C:\ScalaRedis> echo %REDIS_PORT%
Output:
    1234

C:\ScalaRedis> scala -classpath target/scala-2.10/scalaredis_2.10-1.0.jar tutorials.typesafe.TypeSafeTest
Output:
    Hostname: 1.2.3.4
    Port: 1234
As observed, the host name and port that is set in the system environment variables gets substituted.
Production (AWS EMR)
[hadoop@ip-xx-y-zz-12 arvind]$ echo $HTTP_PORT
Output:
<Blank>
[hadoop@ip-xx-y-zz-12 arvind]$ scala -classpath deploy/scala-redis.jar com.csscorp.restapi.RestServer
Output:
2016/12/27 05:56:04-286 [INFO] com.csscorp.restapi.RestServer$ - Hostname: localhost
2016/12/27 05:56:04-287 [INFO] com.csscorp.restapi.RestServer$ - Port: 8080

[hadoop@ip-xx-y-zz-12 arvind]$ export HTTP_PORT=8081
[hadoop@ip-xx-y-zz-12 arvind]$ echo $HTTP_PORT
Output:
8081
[hadoop@ip-xx-y-zz-12 arvind]$ scala -classpath deploy/scala-redis.jar com.csscorp.restapi.RestServer
Output:
2016/12/27 05:59:39-304 [INFO] com.csscorp.restapi.RestServer$ - Hostname: localhost
2016/12/27 05:59:39-305 [INFO] com.csscorp.restapi.RestServer$ - Port: 8081
Reference
Using Typesafe’s Config for Scala (and Java) for Application Configuration
Scala – Head, Tail, Init & Last
Sample Program
object SequencesTest {

  // Conceptual representation
  println("""nag arvind gudiseva scala""")
  println("""---> HEAD""")
  println("""nag arvind gudiseva scala""")
  println("""... ---------------------> TAIL""")
  println("""nag arvind gudiseva scala""")
  println("""-------------------> INIT""")
  println("""nag arvind gudiseva scala""")
  println("""................... -----> LAST""")
  println("-----------------------------------")

  def main(arg: Array[String]): Unit = {

    val str1: String = "nag arvind gudiseva scala"
    val str1Arr: Array[String] = str1.split(" ")

    println("HEAD: " + str1Arr.head)
    println("TAIL: " + str1Arr.tail.deep.mkString)
    println("INIT: " + str1Arr.init.deep.mkString)
    println("LAST: " + str1Arr.last)

    println("-----------------------------------")

  }

}
Output
-----------------------------------
HEAD: nag
TAIL: arvindgudisevascala
INIT: nagarvindgudiseva
LAST: scala
-----------------------------------
Reference
Scala sequences – head, tail, init, last
Git Commands on Windows
Install Git on Windows
1. Download the latest Git for Windows stand-alone installer

2. Use the default options from Next and Finish.

3. Open Command Prompt

4. Configure Git username and email (be associated with any commits)
Git global setup:
    C:\> git config --global user.name "Nag Arvind Gudiseva"
    C:\> git config --global user.email "nag.gudiseva@csscorp.com"
Git Command line instructions
A. Create a new repository
    C:\> git clone https://gitlab.com/csscorpglobal/analytics-sample-project.git
    C:\> cd analytics-sample-project
    C:\> touch README.md
    C:\> git add README.md
    C:\> git commit -m "add README"
    C:\> git push -u origin master
B. Existing folder or Git repository
    C:\> cd existing_folder
    C:\> git init
    C:\> git remote add origin https://gitlab.com/csscorpglobal/analytics-sample-project.git
    C:\> git add .
    C:\> git commit
    C:\> git push -u origin master
C. In Linux
    $ git config --global http.proxy ""
    $ cd ~/gudiseva
    $ git init
    $ git status
    $ git add arvind.jpeg
    $ git commit -m “Add arvind.jpeg.”
    $ git remote add origin https://github.com/gudiseva/arvind.git
    $ git remote -v
    $ git remote status
    $ git remote diff
    $ git push
Jersey Multipart File Upload Maven Project
Create Maven Project with the below archetype (Jersey Version: 2.9; Jetty Version: 9.2.18.v20160721):
mvn archetype:generate -DarchetypeGroupId=org.glassfish.jersey.archetypes -DarchetypeArtifactId=jersey-quickstart-webapp -DarchetypeVersion=2.9
Apache FLUME Installation and Configuration in Windows 10
1. Download & install Java
2. Create a Junction Link. (Needed as the Java Path contains spaces)
    C:\Windows\system32>mklink /J "C:\Program_Files" "C:\Program Files"
    Junction created for C:\Program_Files <<===>> C:\Program Files
3. Set Path and Classpath for Java
    JAVA_HOME=C:\Program_Files\Java\jdk1.8.0_102
    PATH=%JAVA_HOME%\bin;C:\Program_Files\Java\jdk1.8.0_102\bin
    CLASSPATH=%JAVA_HOME%\jre\lib
4. Download Flume
Download apache-flume-1.7.0-bin.tar.gz
5. Extract using 7-Zip
Move to C:\flume\apache-flume-1.7.0-bin directory
6. Set Path and Classpath for Flume
    FLUME_HOME=C:\flume\apache-flume-1.7.0-bin
    FLUME_CONF=%FLUME_HOME%\conf
    CLASSPATH=%FLUME_HOME%\lib\*
    PATH=C:\flume\apache-flume-1.7.0-bin\bin
7. Download Windows binaries for Hadoop versions
https://github.com/steveloughran/winutils
8. Copy
To C:\hadoop\hadoop-2.6.0\bin
9. Set Path and Classpath for Hadoop
    PATH=C:\hadoop\hadoop-2.6.0\bin
    HADOOP_HOME=C:\hadoop\hadoop-2.6.0
10. Edit log4j.properties file
    flume.root.logger=DEBUG,console
    #flume.root.logger=INFO,LOGFILE
11. Copy flume-env.ps1.template as flume-env.ps1.
    Add below configuration:
    $JAVA_OPTS="-Xms500m -Xmx1000m -Dcom.sun.management.jmxremote"
12. Copy flume-conf.properties.template as flume-conf.properties
13. — Flume Working Commands —
C:\> cd %FLUME_HOME%/bin
C:\flume\apache-flume-1.7.0-bin\bin> flume-ng agent –conf %FLUME_CONF% –conf-file %FLUME_CONF%/flume-conf.properties.template –name agent
14. Install HDInsight Emulator (Hadoop) on Windows 10
a. Install Microsoft Web Platform Installer 5.0
b. Search for HDInsight
c. Select Add -> Install -> I Accept -> Finish
d Format Namenode
C:\hdp> hdfs namenode -format
e. Start Hadoop and Other Services
C:\hdp> start_local_hdp_services
f. Verify
c:\hdp> hdfs dfsadmin -report
g. Hadoop Sample Commands
C:\hdp\hadoop-2.4.0.2.1.3.0-1981> hdfs dfs -ls hdfs://lap-04-2312:8020/
C:\hdp\hadoop-2.4.0.2.1.3.0-1981> hdfs dfs -mkdir hdfs://lap-04-2312:8020/users
C:\hdp\hadoop-2.4.0.2.1.3.0-1981> hdfs dfs -mkdir hdfs://lap-04-2312:8020/users/hadoop
C:\hdp\hadoop-2.4.0.2.1.3.0-1981> hdfs dfs -mkdir hdfs://lap-04-2312:8020/users/hadoop/flume
f. Stop Hadoop and Other Services
C:\hdp> stop_local_hdp_services
13. — Other Flume Commands —
C:\> cd %FLUME_HOME%/bin
C:\flume\apache-flume-1.7.0-bin\bin> flume-ng agent –conf %FLUME_CONF% –conf-file %FLUME_CONF%/seq_log.properties –name SeqLogAgent
C:\flume\apache-flume-1.7.0-bin\bin> flume-ng agent –conf %FLUME_CONF% –conf-file %FLUME_CONF%/seq_gen.properties –name SeqGenAgent
C:\flume\apache-flume-1.7.0-bin\bin> flume-ng agent –conf %FLUME_CONF% –conf-file %FLUME_CONF%/flume-conf.properties –name TwitterAgent
Note: Sample Configurations and Properties are attached.
Apache Flume Installation & Configurations on Ubuntu 16.04
1. Download Flume
2. Extract Flume tar
$ tar -xzvf apache-flume-1.7.0-bin.tar.gz
3. Move to a folder
$ sudo mv apache-flume-1.7.0-bin /opt/
$ sudo mv apache-flume-1.7.0-bin apache-flume-1.7.0
4. Update the Path
$ gedit ~/.bashrc
export FLUME_HOME=/opt/apache-flume-1.7.0
export FLUME_CONF_DIR=$FLUME_HOME/conf
export FLUME_CLASSPATH=$FLUME_CONF_DIR
export PATH=$PATH:$FLUME_HOME/bin
5. Update the Flume Environment
$ cd conf/
$ cp flume-env.sh.template flume-env.sh
$ gedit flume-env.sh
export JAVA_HOME=/usr/lib/jvm/java-8-oracle
$JAVA_OPTS=”-Xms500m -Xmx1000m -Dcom.sun.management.jmxremote”
export CLASSPATH=$CLASSPATH:/FLUME_HOME/lib/*
$ cd ..
6. Update log4j.properties
flume.root.logger=DEBUG,console
#flume.root.logger=INFO,LOGFILE
7. Reload BashRc
$ source ~/.bashrc (OR) . ~/.bashrc
8. Test Flume
$ flume-ng –help
9. Start Hadoop
$ start-all.sh
$ hadoop fs -ls hdfs://localhost:9000/nag
$ hdfs dfs -mkdir hdfs://localhost:9000/user/gudiseva/twitter_data
10. Run the following commands:
A. Twitter
$ cd $FLUME_HOME
$ bin/flume-ng agent –conf ./conf/ -f conf/twitter.conf Dflume.root.logger=DEBUG,console -n TwitterAgent
(OR)
$ ./flume-ng agent -n TwitterAgent -c conf -f ../conf/twitter.conf
(OR)
$ ./bin/flume-ng agent –conf $FLUME_CONF –conf-file $FLUME_CONF/twitter.conf Dflume.root.logger=DEBUG,console –name TwitterAgent
B. Sequence
$ cd $FLUME_HOME
$ bin/flume-ng agent –conf ./conf/ -f conf/seq_gen.conf Dflume.root.logger=DEBUG,console -n SeqGenAgent
(OR)
$ ./flume-ng agent -n SeqGenAgent -c conf -f ../conf/seq_gen.conf
(OR)
$ ./bin/flume-ng agent –conf $FLUME_CONF –conf-file $FLUME_CONF/seq_gen.conf –name SeqGenAgent
C. NetCat
$ cd $FLUME_HOME
$ ./bin/flume-ng agent –conf $FLUME_CONF –conf-file $FLUME_CONF/netcat.conf –name NetcatAgent -Dflume.root.logger=INFO,console
D. Sequence Logger
$ cd $FLUME_HOME
$ ./bin/flume-ng agent –conf $FLUME_CONF –conf-file $FLUME_CONF/seq_log.conf –name SeqLogAgent -Dflume.root.logger=INFO,console
E. Cat / Tail File Channel
$ cd $FLUME_HOME
$ ./bin/flume-ng agent –conf $FLUME_CONF –conf-file $FLUME_CONF/cat_tail.properties –name a1 -Dflume.root.logger=INFO,console
F. Spool Directory
$ cd $FLUME_HOME
$ ./bin/flume-ng agent –conf $FLUME_CONF –conf-file $FLUME_CONF/flume-conf.properties –name agent -Dflume.root.logger=INFO,console
G. Default Template
$ cd $FLUME_HOME
$ ./bin/flume-ng agent –conf $FLUME_CONF –conf-file $FLUME_CONF/flume-conf.properties.template –name agent -Dflume.root.logger=INFO,console
G. Multiple Sinks
$ cd $FLUME_HOME
$ ./bin/flume-ng agent –conf $FLUME_CONF –conf-file $FLUME_CONF/multiple_sinks.properties –name flumeAgent -Dflume.root.logger=INFO,LOGFILE
11. Netcat
A. Check if Netcat is installed or not
   $ which netcat
   $ nc -h
B. Else, install Netcat
$ sudo apt-get install netcat
C. Netcat in listening (Server) mode
$ nc -l -p 12345
D. Netcat in Client mode
   $ nc localhost 12345
   $ curl telnet://localhost:12345
E. Netcat as a Client to perform Port Scanning
   $ nc -v hostname port
   $ nc -v www.google.com 80
     GET / HTTP/1.1
Note: Sample Configurations and Properties are attached.
cat_tail-properties; flume-conf-properties; multiple_sinks-properties; netcat-conf; seq_gen-conf; seq_log-conf; twitter-conf
Lambda Architecture
What is the Lambda Architecture?
Nathan Marz came up with the term Lambda Architecture (LA) for a generic, scalable and fault-tolerant data processing architecture, based on his experience working on distributed data processing systems at Backtype and Twitter.
The LA aims to satisfy the needs for a robust system that is fault-tolerant, both against hardware failures and human mistakes, being able to serve a wide range of workloads and use cases, and in which low-latency reads and updates are required. The resulting system should be linearly scalable, and it should scale out rather than up.
Here’s how it looks like, from a high-level perspective:

- All data entering the system is dispatched to both the batch layer and the speed layer for processing.
- The batch layer has two functions: (i) managing the master dataset (an immutable, append-only set of raw data), and (ii) to pre-compute the batch views.
- The serving layer indexes the batch views so that they can be queried in low-latency, ad-hoc way.
- The speed layer compensates for the high latency of updates to the serving layer and deals with recent data only.
- Any incoming query can be answered by merging results from batch views and real-time views.
Reference: http://lambda-architecture.net/
ssh to Ubuntu 16.04 running on Oracle VM VirtualBox
I. In Ubuntu VM:
1. Localhost IP (ifconfig): 127.0.0.1
2. Install the ssh server and client
$ sudo apt-get install ssh
3. Default SSH is listening on port 22
$ ssh gudiseva@127.0.0.1
4. Reconfigure the port for the ssh server
$ sudo nano /etc/ssh/sshd_config
Change Port 22 to Port 2222
5. Reload the configuration
$ sudo service ssh force-reload
6. Test the connection
$ ssh gudiseva@127.0.0.1 -p 2222
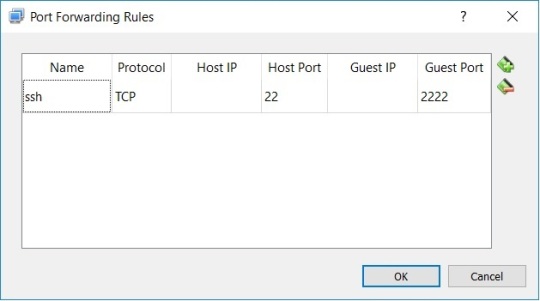
II. In Oracle VM VirtualBox Manager:
III. In PuTTY / WinSCP:
Host / IP Address: 127.0.1.1
Port: 22
AWS Essentials for Hadoop Developers
MapReduce (with HDFS Path)
hadoop jar WordCount.jar WordCount /analytics/aws/input/result.csv /analytics/aws/output/1
MapReduce (with S3 Path)
hadoop jar WordCount.jar WordCount s3://emr-analytics-dev/input/result.csv s3://emr-analytics-dev/output/2
AWS S3 Cp
Usage: Copy files from EBS (mounted on EMR) to S3
aws s3 cp /mnt1/analytics/aruba/aruba_2016_clean/aruba_2016_full.csv s3://emr-analytics-dev/hdfs/analytics/aruba/
S3DistCp
Usage: Copy files from (a) HDFS to S3; (b) S3 to HDFS; (c) S3 to S3
s3-dist-cp –src=hdfs:///nag/sample.xml –dest=s3://emr-analytics-dev/conf/
s3-dist-cp –src=s3://emr-analytics-dev/jars/ –dest=hdfs:///nag/
s3-dist-cp –src=s3://emr-analytics-dev/jars/ –dest=/analytics/aws/input/
s3-dist-cp –src=hdfs:///analytics/aws/input/result.csv –dest=s3://emr-analytics-dev/conf/
WGet
Usage: Copy files from S3 to EMRFS
wget http://emr-analytics-dev.s3.amazonaws.com/jars/WordCount.jar [Action Required: S3 Folder -> Actions -> Make Public]
S3Put
Usage: Copy files from EMRFS to S3
s3put -a <Access Key Id> -s <Secret Access Key> -b emr-analytics-dev –region ap-southeast-1 /home/hadoop/WordCountTest.jar
s3put -b emr-analytics-dev –region ap-southeast-1 /home/hadoop/WordCountTest.jar
s3put -b emr-analytics-dev -p /home/hadoop -k jars –region ap-southeast-1 /home/hadoop/WordCountTest.jar
Hive External Table with S3
CREATE EXTERNAL TABLE aruba_open_word_cloud_v5_s3(
product string,
category string,
sub_category string,
calendar_year string,
calendar_quarter string,
csat string,
sentiment string,
sentiment_outlier string,
word string,
count int)
ROW FORMAT DELIMITED
FIELDS TERMINATED BY ‘\t’
STORED AS INPUTFORMAT
‘org.apache.hadoop.mapred.TextInputFormat’
OUTPUTFORMAT
‘org.apache.hadoop.hive.ql.io.HiveIgnoreKeyTextOutputFormat’
LOCATION
‘s3://emr-analytics-dev/hdfs/analytics/aruba/word_cloud_v5_output’;
Location of HDFS Site Configuration (hdfs-site.xml) in AWS
/usr/lib/hadoop/etc/hadoop
